


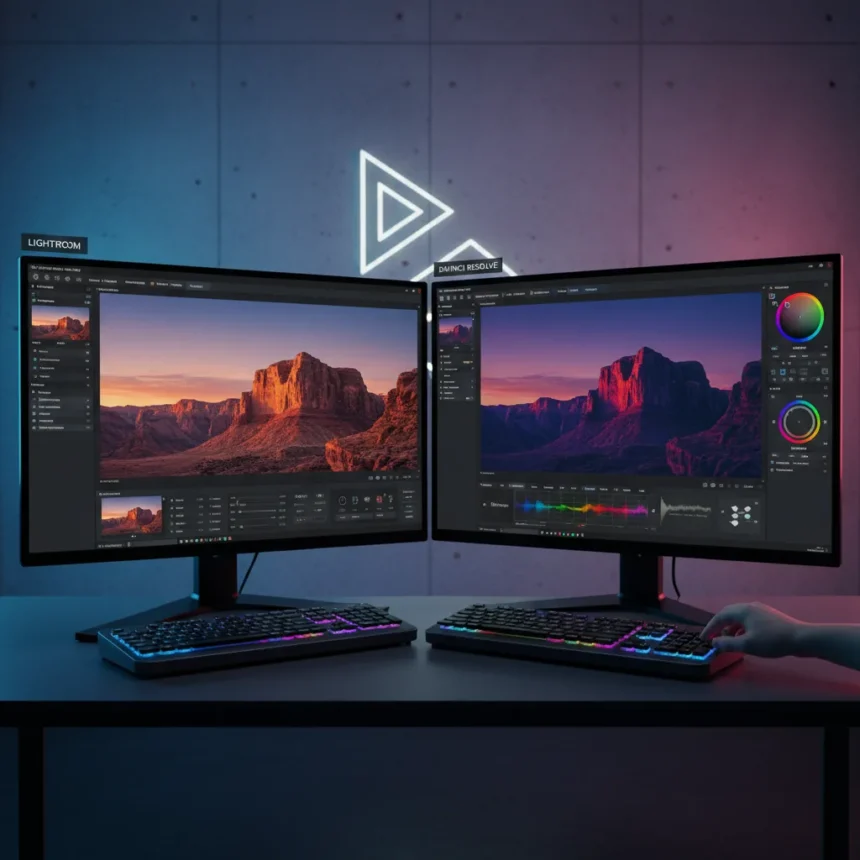
DaVinci Resolve photo editing has arrived, and it rewrites the rules for how creatives approach still image post-production. Blackmagic Design’s video editing powerhouse now fully integrates photo image editing into its color-grading workflow, positioning itself as a serious alternative to Lightroom for photographers who value creative control over convenience.
Key Takeaways
- DaVinci Resolve photo editing uses video-grade color nodes, curves, and AI effects on RAW and JPEG stills.
- Free version supports 4K output; Studio version unlocks 8K RAW debayering and advanced color correction.
- Workflow differs from Lightroom—photos sit on a timeline as clips, edited via node trees and composite modes.
- AI Resolve FX tools include facial recognition, depth mapping, noise reduction, and lens correction.
- Third-party plugins like Dehancer add film profiles, white balance, and analogue-style grading controls.
Why DaVinci Resolve Photo Editing Changes the Game
The shift from Lightroom’s panel-based interface to DaVinci Resolve’s node-tree approach sounds intimidating—until you realize what you gain. Instead of sliders, you get curves, color wheels, RAW tab adjustments, and node trees that let you build complex color corrections with surgical precision. The video editing heritage means access to effects like Halation, Film Grain, Vignette, and Film Look Creator that Lightroom simply cannot match.
Here’s the critical difference: DaVinci Resolve photo editing is not designed to replace Photoshop or Affinity Photo. It cannot do pixel-level retouching, layer masks, or content-aware fill. But for color grading, exposure correction, and creative film looks, it operates in a league above Lightroom. The workflow is completely different because it’s still a video editor at heart, which is exactly why editing your photos in DaVinci Resolve is so amazing.
The free version limits timeline and output to Ultra HD 4K (3840 x 2160 px), which covers most still photography needs. The Studio version enables 8K real-time color correction and debayering on RAW footage, opening possibilities for ultra-high-resolution archival work.


DaVinci Resolve Photo Editing Workflow: How It Actually Works
The practical workflow requires thinking differently. Import photos as clips onto the timeline, not as individual files in a library. Open the color page and add a node before the CST (color space transform) node. Use curves or color wheels to raise exposure, then access the RAW tab and set it to clip for RAW-specific adjustments. Tweak white balance, shadows, and highlights in your first color correction node, watching the waveform in the lower right for technical control.
Memory slots let you copy color grades from one photo and paste them to the next—press ALT+1 to copy settings from a source clip, then CMD+1 to paste to the next image, fine-tuning as needed. Use the up and down arrow keys to navigate between clips on the timeline, repeating adjustments across batches. For advanced work, separate luminance (composite mode: Luminosity) and color (composite mode: Color) into different nodes, allowing independent control over brightness and hue.


Set your project’s color management output to Rec.709 2.4 before exporting. This ensures colors match industry standards and prevents unexpected shifts between editing and delivery.
AI and Plugin Power in DaVinci Resolve Photo Editing
The DaVinci Neural Engine brings AI capabilities that elevate DaVinci Resolve photo editing beyond traditional Lightroom workflows. Facial recognition, speed warp retiming, advanced color balancing, temporal and spatial noise reduction, and lens distortion correction are all built in. The new AI Resolve FX Depth Map 2 analyzes scenes faster, enabling mattes, foreground isolation, lens blur, and depth-specific grading—features that took manual masking work in older tools.
Third-party plugins expand creative possibilities. Dehancer, for instance, adds film profiles with exposure, push/pull, contrast, saturation, and analogue range limiter controls, plus white balance and shadows/highlights adjustments. These plugins use the waveform for precise technical control, letting you grade with the accuracy of a color suite.
DaVinci Resolve Photo Editing vs. Lightroom: The Real Trade-Off
Lightroom wins on speed and simplicity. Its library management, preset system, and intuitive sliders let photographers edit hundreds of images in a session without thinking about node trees or color spaces. DaVinci Resolve photo editing trades that convenience for power. You cannot batch-process stills the way you can in Lightroom’s Library module. The timeline-based workflow is slower for quick edits but exponentially more capable for creative grading.


Lightroom’s strength is its ecosystem—syncing across devices, mobile editing, and seamless integration with Photoshop. DaVinci Resolve photo editing exists in isolation, a video editor that happens to handle stills. For photographers who shoot RAW and care about color science, who want film looks and creative effects, who are willing to learn a different interface, DaVinci Resolve photo editing is the more powerful choice. For professionals managing large shoots with tight deadlines, Lightroom remains the faster option.
Is DaVinci Resolve Photo Editing Right for You?
If you grade your own video and want a unified color-grading environment for both footage and stills, DaVinci Resolve photo editing is a no-brainer. The node-tree approach feels natural once you internalize it, and the results look incredible. If you shoot high-end RAW and want access to professional color correction tools without jumping between software, this is a significant shift. If you manage thousands of photos and rely on Lightroom’s library and syncing, switching will slow you down.
Does DaVinci Resolve photo editing support RAW files?
Yes. DaVinci Resolve photo editing supports RAW photo editing through the RAW tab, allowing adjustments like white balance, exposure, and debayering. The free version handles RAW up to 4K; the Studio version enables 8K RAW debayering for ultra-high-resolution work.
Can DaVinci Resolve photo editing replace Photoshop?
No. DaVinci Resolve photo editing excels at color grading and creative effects but cannot perform pixel-level retouching, content-aware fill, or advanced layer masking that Photoshop offers. It is a color-grading tool first, not a general-purpose image editor.
What is the cost of DaVinci Resolve photo editing?
The free version of DaVinci Resolve includes photo editing with a 4K output limit. The Studio version, which unlocks 8K capabilities and advanced features, is available from Blackmagic Design; pricing varies by region and licensing model.
DaVinci Resolve photo editing does not overthrow Lightroom—it sidesteps it entirely. For creatives who think in color nodes and film looks, who want their photo and video workflows unified, it is the tool they have been waiting for. The question is not whether it is better than Lightroom. The question is whether you are willing to learn a different way of thinking about color to unlock capabilities Lightroom will never have.
Edited by the All Things Geek team.
Source: Creativebloq